WiFi Interface with ESP-07
In this tutorial, we are going to use the ESP8266 WiFi module to communicate with Pixhawk via Wifi.
Required:
- ESP-07 ESP8266 Serial Wi-Fi Wireless Transceiver Module
- FTDI/USB cable: to flash firmware
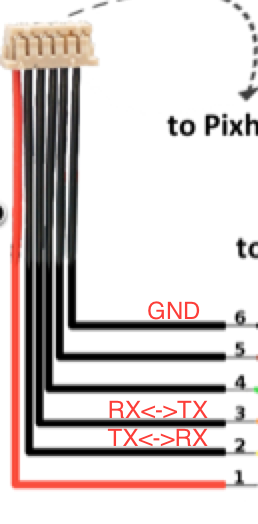
Connect the FTDI/USB cable to the ESP module. The orange cable (TX) is connected to (RX) pin on the module. Yellow cable (RX) is connected to (TX) pin on the module. Connect the power (red) and ground (black).
Follow the guide in the link below to flash the mavesp8266 firmware.
Follow the
this guide
to setup the ESP8266.
NOTE: Use platformio run -e esp01_1m -t upload to upload the firmware to the board.
Connect the module to the Pixhawk as follows.
- NOTE: You first need to make sure that you configured
TELEM2port to be used for ESP link with baud 921600. You can do this, by first, connecting to Pixhawk via USB, and modify theSYS_COMPparameter in the System tab on the left. Now, you can proceed. - Power-on the Pixhawk with the WiFi module connected to
TELEM2as mentioned above. - Search for the Pixracer WiFi netwrok. Connect to that network with the password pixracer.
- Open QgroundControl and connect using UDP connection.
Now you are connected to Pixhawk via WiFi. The Wifi Module is in Access point mode by default, and it creates its own WiFi network (Pixracer). If you wish to connect to your own local WiFi network, then
- in QGC, while you are connected to Pixracer network, go to the WiFi Bridge tab on the left and choose station mode.
- Write the desired network name and password in the appropriate field.
- Restart Pixhawk, and the WiFi module should try to connect to your local network.
- Now, you can connect your machine to the same local network, then connect to Pixhawk from QGC via UDP.
Enjoy!